If you have fine or thin hair, you already know the real problem isn’t finding a pretty updo — it’s finding one that survives past noon. Pins slide out, “volume” flattens within the hour, and half the styles you save online were clearly tested on hair twice as thick as yours.
The good news: the issue usually isn’t your hair. It’s the technique. Certain updos are built to work with less density instead of fighting it, using texture, sectioning, and placement to fake fullness and actually stay put. If you’ve struggled with this before, it’s worth comparing notes with our guide to hairstyles for thin fine hair over 60, since a lot of the same principles apply no matter your age.
Below are 13 updos that are specifically chosen — and tested — for fine and thin textures, so you can stop guessing and start pinning with confidence.
First, A Few Ground Rules for Fine Hair Updos
Before we dive in, there are a few things that changed everything for me:
- Dirty hair is your best friend. Fine hair grips better when it’s not freshly washed. If you have to wash it, use a texturizing spray or dry shampoo before styling.
- Tease strategically. You’re not back-combing for a 1960s beehive — just lightly tease the roots and mid-sections to create grip.
- Use the right bobby pins. Spin pins (the coiled kind) are genuinely game-changing for thin hair. Regular flat pins slip right out.
- Skip heavy serums. Anything oily makes fine hair collapse faster. Stick to light-hold hairspray and texturizing products.
Now let’s get into it.
1. The Textured Low Bun

This one’s my personal everyday go-to and honestly, it’s more forgiving than any other style on this list.
Why it works for thin hair: A low bun doesn’t demand volume — it creates the illusion of it by bunching hair together and letting a few pieces frame the face.
How to do it:
- Spritz dry shampoo or texturizing spray at the roots and scrunch.
- Gather hair at the nape of your neck — not too tight.
- Twist loosely and wrap into a bun. Don’t smooth it out.
- Secure with spin pins rather than a hair tie and pins.
- Pull out a few face-framing strands at the temples.
- Spritz with a flexible-hold hairspray like Kenra Platinum Silkening Mist.
Who it suits: Every face shape. Oval and heart-shaped faces especially.
Styling difficulty: Beginner-friendly. Seriously, ten minutes max.
Common mistake: Making it too neat. Sleekness is the enemy here — texture is what gives the illusion of fullness.
2. The French Twist

Okay, hear me out. The French twist sounds fancy and complicated, but it’s actually great for fine hair because it folds the hair rather than stretching it, so thinness is less obvious.
How to do it:
- Gather all hair to one side at the back.
- Twist the hair upward in a roll against your head.
- Tuck the ends in at the top and secure with bobby pins along the fold.
- Finish with medium-hold hairspray.
Stylist insight: Salon stylists often recommend this for clients with fine hair attending events because it photographs beautifully — it looks full even when the hair itself isn’t.
Maintenance level: Medium. You’ll want to practice twice before an actual event.
Trim frequency: Works better with hair that’s been trimmed recently — blunt ends tuck more cleanly.
3. Bubble Braid Updo

This one is trending on Pinterest right now for a reason — it adds so much visual volume, and fine hair actually performs surprisingly well in it.
How to do it:
- Start with a high ponytail.
- Add a hair tie every 2–3 inches down the length.
- Gently pull out (loosen) each section between the ties to create the bubble effect.
- Secure the last section into a small bun or tuck the tail under.
Pro tip: The pulling-apart step is everything. Don’t skip it. This is what creates the fullness illusion.
Common mistake: Using a thick elastic at every section — it weighs fine hair down. Use thin, clear elastics.
Face shape: Flattering on round and square faces because the vertical line elongates.
4. Half-Up Twisted Crown

This is the one I wear when I want to look like I tried but also have literally 8 minutes before I need to leave.
How to do it:
- Take two sections from either side of your temples.
- Twist each section back and secure them together at the center back with bobby pins.
- Leave the rest of your hair down.
Why it works: You’re not fighting with the entire head of hair. The top section creates the “updo” look while the bottom length adds body.
Styling difficulty: Super easy. Zero learning curve.
Practical pros: Minimal product needed, holds well even in humidity.
Practical cons: Can feel underdone for formal events. Dress it up with a decorative clip.
5. Rope Braid Bun

A rope braid is basically a two-strand twist — no complicated braiding technique required. For fine hair, this creates more texture than a regular bun without requiring the actual thickness a traditional braid needs.
How to do it:
- Divide hair into two sections.
- Twist both sections in the same direction (clockwise), then wrap them around each other in the opposite direction.
- Coil the resulting rope into a bun at your nape or crown.
- Secure with pins and hairspray.
Stylist insight: Rope braids create the optical illusion of thicker hair — they have more surface texture than a simple braid, so the strands look more substantial.
6. Messy Top Knot (Done Right)

Every thin-haired person has attempted this and most of us have failed. The secret is that a top knot for fine hair is not the same as a regular top knot.
How to make it work:
- Tease the crown area first — seriously, really backcomb it.
- Put hair in a loose high ponytail.
- Twist and coil — but stop before it gets tight.
- Let it be imperfect. Deliberately pull out pieces.
- Wrap a thin elastic around the base, not the bun itself.
What I learned the hard way: If your top knot looks like a smooth little button, it’ll also look sparse. Embrace the mess.
Maintenance level: Needs a touchup after a few hours of movement.
7. Pinned-Back Curtain Bang Style

If you have curtain bangs or face-framing layers, this is basically made for you.
How to do it:
- Style your curtain bangs normally.
- Gather the rest of the hair back into a low bun or ponytail.
- Let the bangs fall naturally framing your face.
Why it works for thin hair: The bangs at the front create an illusion of fullness where it matters most — around the face. The back being up keeps things elevated and polished.
Face shape: Especially flattering on long or oval faces.
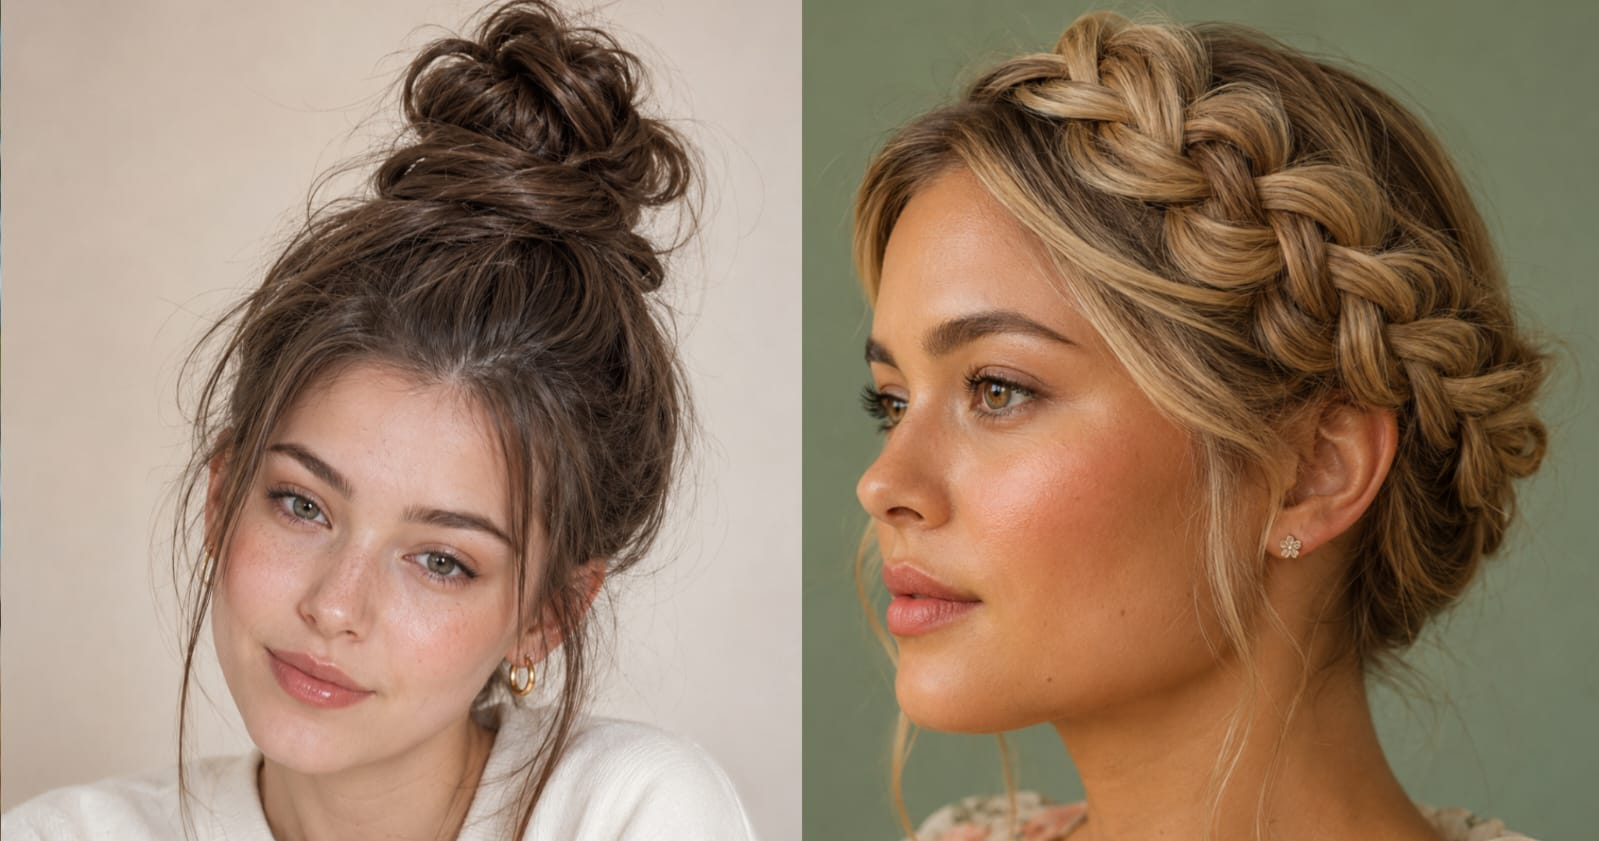
8. Dutch Braid Crown

This takes some practice, but once you nail it, you’ll use it for everything from casual days to weddings.
A Dutch braid sits above the hair rather than under it, which means it stands out visually and looks thicker than it actually is.
How to do it:
- Start at one ear, gathering three small sections.
- Cross the strands under (not over) each other — that’s what makes it Dutch.
- Add small sections as you work across the head toward the other ear.
- Secure at the end and gently tug each loop to loosen and expand the braid.
Common mistake: Making sections too big. Smaller, more frequent sections = more texture = more volume illusion.
Styling difficulty: Intermediate. Give yourself a week of practice.
9. Ballerina Bun with Volume Trick

The classic ballerina bun often looks flat on thin hair. But there’s a trick that actually works.
The volume trick:
- Use a doughnut bun form (those foam ring things from the dollar section of Target).
- Put hair in a ponytail through the ring.
- Spread hair over the foam ring evenly and secure.
- The ring fills out the bun shape — so it looks full regardless of your hair thickness.
Honest review: This changed my formal updo game completely. The bun form does the structural work so your hair doesn’t have to.
10. Loose Gibson Tuck

This is an underrated one. The Gibson tuck is almost like a hidden updo — sleek, simple, and surprisingly elegant.
How to do it:
- Put hair in a loose low ponytail.
- Split the hair above the elastic to create a hole.
- Flip the ponytail up through the hole, then tuck the tail back down and under.
- Adjust to smooth and secure with pins.
Why fine hair loves this: There’s no actual bulk created — it’s all tuck and fold, so thinness doesn’t show.
Styling difficulty: 5 minutes once you’ve done it twice.
Maintenance level: Low. This thing doesn’t budge.
11. Twisted Half-Up Bun

This gives the look of a full updo with half the hair commitment.
How to do it:
- Take the top two-thirds of your hair.
- Twist it into a bun at the crown or slightly back.
- Leave the bottom section down.
- Tease the crown section before twisting for extra lift.
Pro tip: Use a claw clip instead of pins if you want a quicker, more casual version. The Teleties brand claw clips are lightweight enough not to pull fine hair out.
12. Braided Crown Updo

Two braids wrapped around the head like a crown — this is romantic, works for weddings or festivals, and fine hair actually handles it beautifully because the braids lie flat and the whole style doesn’t require mass.
How to do it:
- Part hair down the middle.
- Braid each side in a simple three-strand braid.
- Bring each braid across the top of your head and pin securely on the opposite side.
- Tuck the ends under the opposite braid.
Face shape: Incredibly flattering on square and round faces — the halo effect softens angles.
Common mistake: Making the braids too tight. Loosen them by gently pulling the outer edges for a fuller, more romantic look.
13. The Faux Bob Updo

Can’t commit to a bob haircut? Pin it. This one gets a ton of traction on Pinterest boards and it’s genuinely achievable.
How to do it:
- Curl or wave your hair first (this helps thin hair grip better).
- Gather all hair at the back.
- Fold the length up and pin in sections, tucking the tail under.
- Adjust the shape to mimic a bob’s curve.
- Smooth the top with light hold spray.
Why it works for thin hair: Folded hair actually creates the illusion of more density than it hanging loose. The bob shape photographs incredibly well.
Practical con: Takes 15–20 minutes to pin properly. Not a morning-rush style.
Practical pro: Lasts all day, turns heads, and nobody needs to know it’s not a real cut.
Products That Actually Help Fine Hair Updos Hold
After trying probably two dozen products, here’s what I keep going back to:
- Moroccanoil Dry Texture Spray — adds grip without any heaviness
- Got2b Glued Hairspray — for styles that need to lock in
- Kenra Platinum Silkening Finishing Mist — for styles where you want movement but still need hold
- Conair Spin Pins — honestly the best $4 investment for thin hair
- Teleties Claw Clips — gentler on fine hair, don’t slide out
Quick Comparison: All 13 Updos at a Glance
| Updo Style | Difficulty | Hold Time |
|---|---|---|
| Textured Low Bun | ⭐ Easy | 6–8 hrs |
| French Twist | ⭐⭐ Medium | 8+ hrs |
| Bubble Braid Updo | ⭐ Easy | 5–6 hrs |
| Half-Up Twisted Crown | ⭐ Easy | 4–5 hrs |
| Rope Braid Bun | ⭐⭐ Medium | 6–7 hrs |
| Messy Top Knot | ⭐ Easy | 3–5 hrs |
| Pinned-Back Curtain Bang | ⭐ Easy | 5–6 hrs |
| Dutch Braid Crown | ⭐⭐⭐ Hard | 8+ hrs |
| Ballerina Bun | ⭐⭐ Medium | 8+ hrs |
| Loose Gibson Tuck | ⭐ Easy | 7–8 hrs |
| Twisted Half-Up Bun | ⭐ Easy | 5–6 hrs |
| Braided Crown Updo | ⭐⭐⭐ Hard | 8+ hrs |
| Faux Bob Updo (Formal/Events) | ⭐⭐ Medium | 7–8 hrs |
FAQ
Q: Can fine hair hold an updo all day? Yes, with the right prep. Dirty or texturized hair holds much better than freshly washed. Using spin pins and a medium-hold spray makes a big difference.
Q: Should I get layers if I have thin hair and want to do updos? Minimal layers, or none at all. Heavy layering removes weight and makes thin hair even harder to work with in updos. Ask your stylist for a “blunt cut with soft layers” if you want movement without too much loss of length.
Q: How often should I trim my hair if it’s fine and thin? Every 8–10 weeks. Fine hair splits faster and split ends make updos look scraggly at the ends. Regular trims keep things looking intentional.
Q: Is it bad to use heat before an updo for fine hair? Not if you use a protectant. A light wave or curl actually helps thin hair grip and stay put longer in an updo. Just don’t go overboard — fine hair is more vulnerable to heat damage.
Q: What’s the biggest mistake thin-haired people make with updos? Trying to make them too neat and polished. Perfectly smooth updos look sparse on thin hair. Texture, looseness, and intentional “undone” elements are what make thin-hair updos look full and gorgeous.
Look, I spent years thinking updos just weren’t for me — that they were designed for people with the kind of hair you see in shampoo commercials. But honestly? Some of the most beautiful updo styles I’ve ever pulled off happened on my thinnest, most “bad hair day” kind of days, just because I finally stopped trying to force thick-hair techniques onto fine hair.
Work with what you have. Embrace the texture. Let it be a little messy. And invest in those spin pins — seriously, they’ll change your life.

