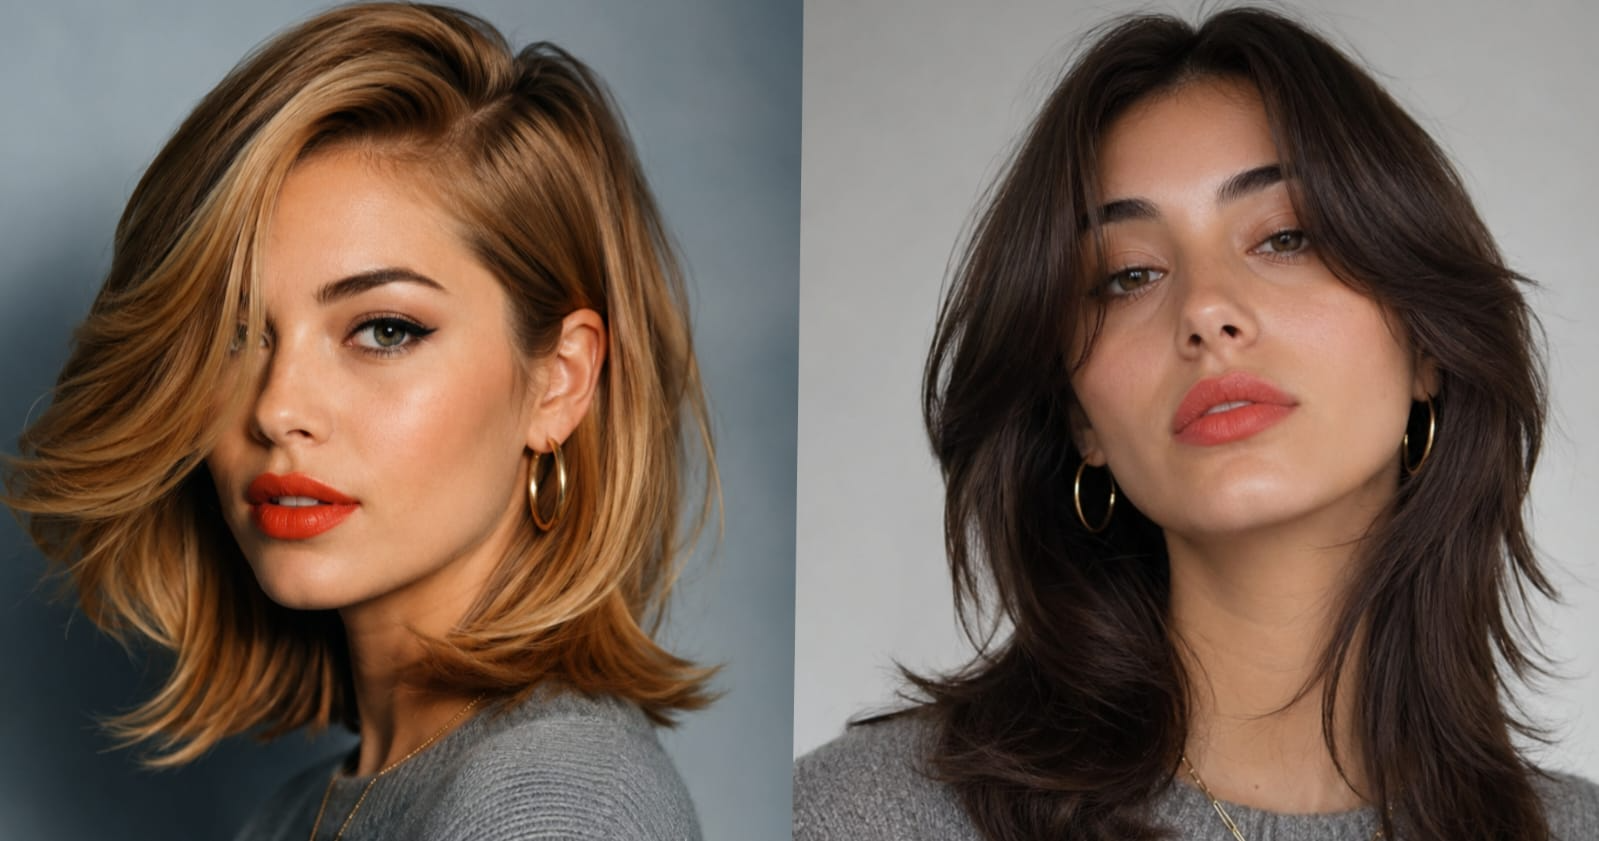
The butterfly haircut gets its name from the way the layers fall — short pieces up top that fan out into longer length below, framing your face the way wings open from a body. It’s one of the only cuts that adds visible movement and volume without sacrificing length, which is exactly why it’s stuck around as a go-to for medium hair.
What makes it especially flexible is how differently it can read depending on your layering depth, parting, and texture. Some versions lean soft and barely-there, almost like a long layered cut with extra face-framing; others go bold, with dramatic shorter pieces near the crown that practically demand a curling iron. If you’re debating between this and something like a long bob, the butterfly cut tends to win when you want layers without losing overall length.
First — What Makes This Cut Different From Regular Layers
Because I asked this exact question and got a vague answer the first time.
Regular layers just thin out your hair gradually from top to bottom. The butterfly cut is more intentional — the shorter layers at the top are significantly shorter, creating almost like a “shelf” of hair that sits on top of your longer lengths underneath. When it moves, those two sections separate slightly, which is where that winged, floaty effect comes from.
It’s not subtle. That’s the whole point.
The 16 Styles — Broken Down Honestly
1. Classic Butterfly Cut, Medium Length

Layers starting around chin level, with the rest of the hair falling to the collarbone or just below. Soft, face-framing pieces curve slightly inward to highlight the cheekbones.
How to Style: Blow-dry with a round brush, directing the face-framing layers inward and under. Finish the ends with a 1-inch curling iron for subtle movement, or leave straight for a sleeker look.
Maintenance Tips: Trim every 8-10 weeks to keep the layer separation crisp. A lightweight leave-in conditioner helps prevent the shorter top layers from frizzing out of shape.
Best For: Most face shapes and hair textures — this is the safest, most versatile starting point if you’re new to the butterfly cut. Works especially well on hair that falls naturally between the collarbone and shoulder.
2. Butterfly Cut with Curtain Bangs

Face-framing curtain bangs that part naturally in the center and blend directly into the butterfly layers, creating one continuous, cohesive shape.
How to Style: Blow-dry the bangs with a round brush, curving them away from the face on both sides. A light dust of texture spray on the ends keeps them from looking too “set.”
Maintenance Tips: Bangs need trimming every 5-6 weeks to stay blended with the rest of the layers — left too long, they’ll start falling flat instead of curving.
Best For: Oval and heart-shaped faces, and anyone wanting to soften a strong forehead or hairline without committing to full bangs.
3. Wavy Hair Butterfly Cut

The natural wave pattern works with the layering instead of against it, giving the cut a lived-in, effortless shape with minimal styling.
How to Style: Apply a curl cream to damp hair and diffuse on low heat, or air-dry and scrunch lightly. Avoid brushing dry, which breaks up the wave pattern.
Maintenance Tips: Use sulfate-free shampoo to preserve wave definition, and trim every 8 weeks so the layers don’t weigh the waves down.
Best For: 2A-2C wave patterns — this version requires the least daily effort of all 16 styles.
4. Straight Hair Butterfly Cut

The same layering structure, but the drama of the cut needs a little styling help to show up on straight strands.
How to Style: A round-brush blowout or a large barrel iron (1.5 inch) on the ends creates the curved-under finish that makes the layers visible. Without styling, the cut looks flatter.
Maintenance Tips: Use a heat protectant every time you style, since straight hair typically needs more frequent heat tools to hold shape.
Best For: Anyone with naturally straight, fine-to-medium density hair who doesn’t mind an extra 10 minutes of styling for the full effect.
5. Curly Butterfly Cut

Volume is added at the crown through the shorter layers, while definition builds at the bottom through the longer ones — solving the classic curly-hair problem of bulk at the sides and flatness on top.
How to Style: Apply curl cream or gel to soaking-wet hair, then diffuse or air-dry without touching until fully dry to avoid frizz.
Maintenance Tips: Deep-condition weekly, since layered curly hair loses moisture faster at the ends. Trim every 10-12 weeks to maintain curl shape.
Best For: 3A-4A curl types dealing with a triangle-shaped silhouette or flat roots.
6. Subtle / Soft Butterfly Cut

Lighter layering with a smaller length difference between the top and bottom sections — noticeable movement without a dramatic transformation.
How to Style: A quick blow-dry with a paddle brush is enough; no curling iron required. Texture spray at the roots adds lift if needed.
Maintenance Tips: Because the layering is minimal, this version grows out slower and needs trims only every 10-12 weeks.
Best For: First-timers who want the benefits of the cut without a noticeable change.
7. Shaggy Butterfly Cut

Choppier ends, more texture, slightly undone. This is the one that photographs best honestly — it has this vintage quality that’s really hard to put into words but you recognize immediately.
It suits people who don’t mind their hair looking a little messy-on-purpose. Not for the corporate presentation crowd.
How to Style: Apply a texturizing salt spray to damp hair and air-dry, or use a flat iron in small sections for a slightly piecey finish. Tousle with fingers, not a brush.
Maintenance Tips: Point-cut trims every 8 weeks keep the choppy ends from growing into a blunt shape.
Best For: Anyone who prefers a slightly undone, low-fuss look over a polished one.
8. 70s Feathered Butterfly Cut

Slightly longer top layers with feathered, flicked-out ends for big, soft, retro-leaning movement.
How to Style: Blow-dry with a round brush, flicking the ends outward at the very last second. A center part leans more vintage; a side part makes it look more modern.
Maintenance Tips: Regular trims (every 8 weeks) keep the feathered ends from losing their flick and turning blunt.
Best For: Medium-thick hair with some natural body — fine, limp hair won’t hold the feathered flick as well without extra product.
9. Butterfly Cut with Money Piece

Face-framing highlights, usually 2-3 shades lighter than the base color, placed exactly where the butterfly layers fall — drawing the eye right to where the cut is doing its best work.
How to Style: Style as usual; the color does most of the visual work. A slight curl at the highlighted pieces makes the contrast pop more.
Maintenance Tips: Toner refresh every 4-6 weeks to keep the highlighted pieces from turning brassy, plus purple or blue shampoo in between salon visits.
Best For: Anyone wanting a cut-and-color combo that looks more expensive than it actually is — works on both light and dark base colors.
10. Butterfly Cut for Fine / Thin Hair

Fine hair is heavy at the bottom and flat at the top — the opposite of what you want. Removing weight through the butterfly layers flips that distribution. My mom tried this at 52 after years of flat, lifeless hair, and genuinely cried happy tears in the salon. I’m not exaggerating.
How to Style: Blow-dry upside down at the roots for lift, then finish with a small-barrel curling iron to add the illusion of thickness.
Maintenance Tips: Avoid heavy conditioners on the roots — apply them mid-shaft to ends only, so the crown doesn’t fall flat again.
Best For: Fine or thin hair that looks limp or lifeless with one-length cuts.
11. Butterfly Cut for Thick Hair

Focused on weight removal from underneath rather than volume on top, using point cutting and thinning shears to control bulk without losing fullness.
How to Style: Air-dry or blow-dry with a diffuser attachment to avoid adding extra volume; a smoothing serum on the ends keeps things controlled.
Maintenance Tips: Ask your stylist specifically about internal thinning at each trim — without it, thick hair regains its bulk quickly between appointments.
Best For: Thick or coarse hair that feels heavy, bulky, or hard to manage in its natural state.
12. Side-Parted Butterfly Cut

The center part dominates social media but the side part honestly looks better on more face shapes. Square, rectangular, oblong faces especially — the asymmetry of a side part breaks up the geometry in a flattering way.
The butterfly layers work slightly differently here — one side has more dramatic framing than the other, which creates a really elegant asymmetric fall.
How to Style: Deep side-part with a comb while hair is damp, then blow-dry the heavier side under and the lighter side back, to set the asymmetry before it dries.
Maintenance Tips: Re-establish the part line at the root regularly — switching parts often can soften the asymmetric shape over time.
Best For: Square, rectangular, and oblong face shapes, where the asymmetry helps break up strong jaw or forehead lines.
13. Butterfly Cut with Side-Swept Bangs

Bangs that sweep across the forehead and tuck behind one ear, blending into the longer layers on that side for fuller forehead coverage than curtain bangs.
How to Style: Blow-dry the bangs across the forehead in the direction they’ll sit, then secure briefly with a clip while the rest of the hair is styled, so they set in place.
Maintenance Tips: Trim every 6 weeks — side-swept bangs lose their sweep and start hanging straight down faster than curtain bangs do.
Best For: Anyone wanting more forehead coverage, or a softer transition between bangs and face-framing layers.
14. Textured Beach Wave Butterfly Cut

A lived-in, slightly undone texture created with sea salt spray and a diffuser, letting the shorter butterfly layers curl naturally around the face.
How to Style: Apply sea salt spray to damp hair, diffuse on low heat, then twist a few face-framing pieces around a 1.25-inch wand for extra definition.
Maintenance Tips: Refresh texture with dry shampoo and a spritz of salt spray on day two or three instead of washing — this style holds up well between washes.
Best For: Low-effort everyday wear, and hair types (straight to wavy) that don’t hold curl on their own
15. Romantic Loose Wave Butterfly Cut

Soft, loose waves throughout, using the butterfly layers to add shape and structure with minimal styling effort — built for special occasions.
How to Style: Curl 6-8 sections total with a 1.5-inch barrel iron, alternating direction of the curl, then run fingers through gently to loosen the waves.
Maintenance Tips: Use a heat protectant and a flexible-hold hairspray to help the waves last through a full event without flattening.
Best For: Weddings, dinners, and events where a polished-but-not-overdone look is the goal..
16. Grown-Out Butterfly Cut

What the cut settles into after a few months without a trim — a softer, more blended layered shape that still holds movement.
How to Style: Treat it like a regular layered cut at this stage — a basic round-brush blowout or loose waves both work well since the sharp layer lines have softened.
Maintenance Tips: This is a good checkpoint to either book a refresh trim to restore the original shape, or let it keep growing into a longer layered style.
Best For: Anyone who wants to see how versatile the cut is over time, or isn’t ready to commit to a strict trim schedule.
You don’t need all four. Pick two based on your hair type and call it done.
Butterfly Cut Styles at a Glance: Length & Styling Time
| Style Name | Length Needed | Time to Style |
|---|---|---|
| Classic Butterfly Cut, Medium Length | Collarbone or below | 10-15 min |
| Butterfly Cut with Curtain Bangs | Collarbone+ (bangs at brow) | 10 min |
| Wavy Hair Butterfly Cut | Shoulder to collarbone | 5 min (air-dry) |
| Straight Hair Butterfly Cut | Collarbone or below | 15-20 min |
| Curly Butterfly Cut | Shoulder to mid-back | 15 min (diffuse) |
| Subtle / Soft Butterfly Cut | Shoulder or below | 5-10 min |
| Shaggy Butterfly Cut | Shoulder to collarbone | 10 min |
| 70s Feathered Butterfly Cut | Collarbone or below | 15 min |
| Butterfly Cut with Money Piece | Shoulder or below | 10-15 min |
| Butterfly Cut for Fine / Thin Hair | Shoulder to collarbone | 15 min |
| Butterfly Cut for Thick Hair | Collarbone or below | 15-20 min |
| Side-Parted Butterfly Cut | Shoulder or below | 10 min |
| Butterfly Cut with Side-Swept Bangs | Collarbone+ (bangs at brow) | 10-15 min |
| Textured Beach Wave Butterfly Cut | Shoulder to collarbone | 10 min (diffuse) |
| Romantic Loose Wave Butterfly Cut | Collarbone or below | 20-25 min |
| Grown-Out Butterfly Cut | Mid-back (post-growth) | 5-10 min |
FAQ
Q: How often do I need to trim it?
Every 8-10 weeks to keep the shape. You’ll feel it when it starts losing structure — the layers get too heavy and the volume disappears.
Q: Will it damage my hair?
No — it’s just a cutting technique, no chemicals involved. If anything, removing the dead weight through layers can make hair look healthier.
Q: Is it hard to style at home?
Once you’ve practiced 3-4 times, no. The first week is always a little awkward with any new cut while you figure out how it behaves.
Q: What if I hate it?
The good news is it grows out into a pretty normal layered medium cut. It’s not a drastic-change-that-takes-years-to-fix situation. Worst case, you wait 3 months.
Q: Does it work on short-medium hair, like just above the shoulders?
It can, but the effect is more subtle. You need a bit of length for the two “sections” of the cut to really separate and do their thing.
Wrapping Up
Eight months of hesitation and I genuinely wish I’d done it sooner. That’s the honest summary.
The butterfly cut for medium hair is one of those things that sounds more complicated than it is and looks more expensive than it costs. Find a stylist who’s done it before (look at their Instagram — most post their work), bring clear photos, and have an actual conversation about your hair type before they pick up the scissors.
And if your friend shows up somewhere with incredible hair and you can’t figure out what’s different about it — ask. It might just be a butterfly cut.

