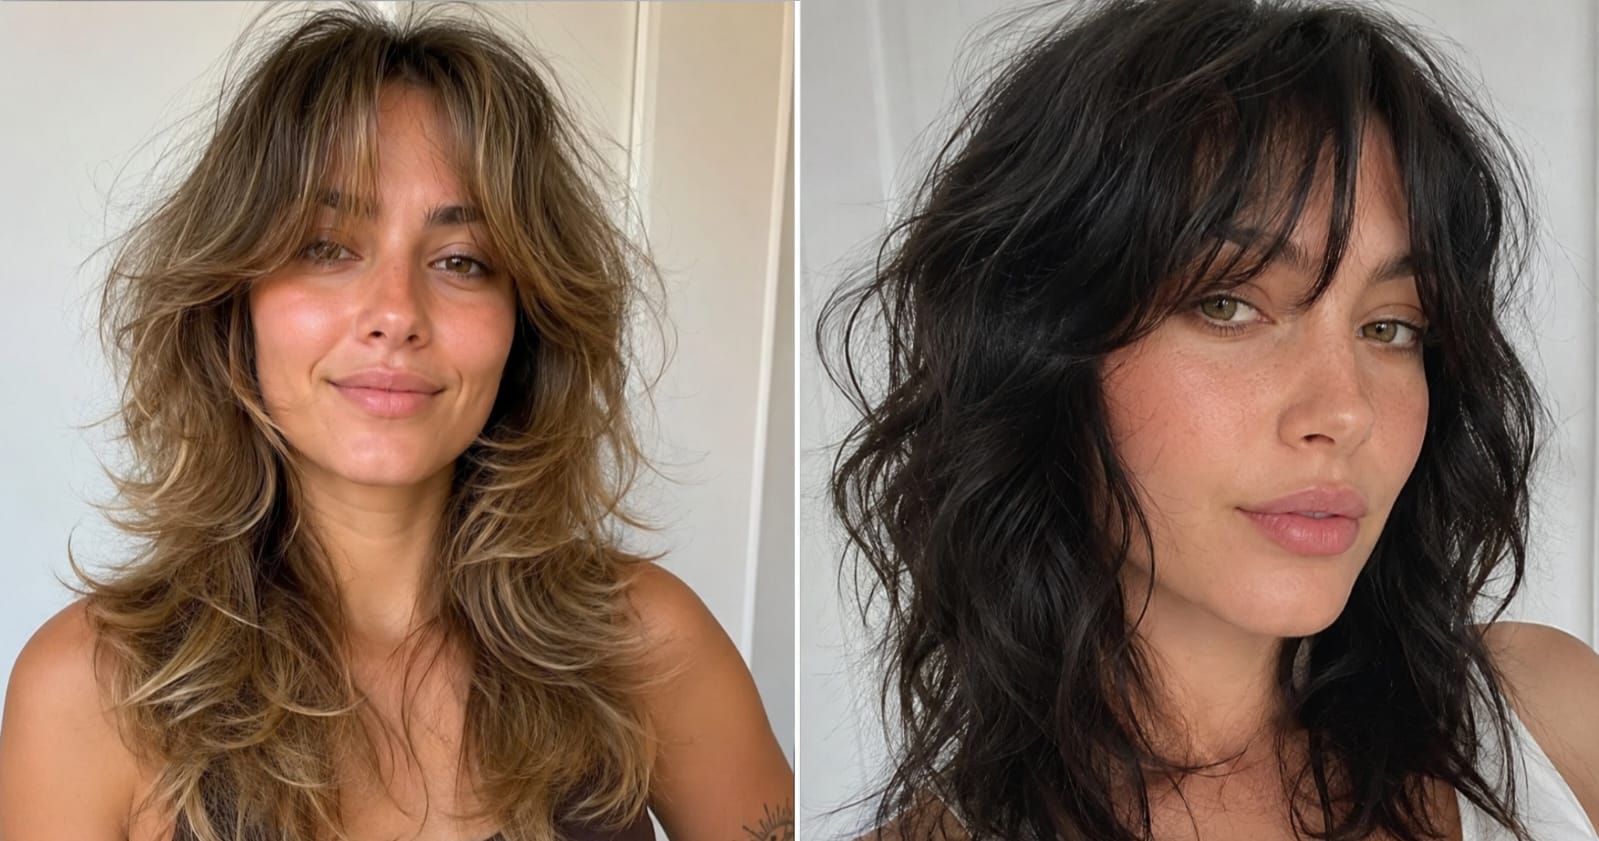
The wolf cut is everywhere right now, and it has been for a while — but here’s the thing most people don’t talk about: the version going viral on your For You page probably looks nothing like the version that will actually work on your hair. That’s not a flaw in the style. It’s just that the wolf cut behaves like two completely different haircuts depending on your texture. On straight hair, the crown layers create volume through tension and movement. On wavy or curly hair, those same layers compress the curl pattern at the root and let it expand toward the ends — which produces an entirely different silhouette, and requires a different approach from your stylist.
Once you understand that distinction, the 2026 versions of this cut start to make a lot more sense. Stylists are now cutting wolf cuts with the texture baked in — meaning straight-hair clients get razor-feathered ends to fake body, while wavy and curly clients get dry-cut layers that respect the natural curl clump. That shift is what’s making the current round of wolf cut photos look so much more wearable and less costume-y than the early 2022 versions.
Below are 15 wolf cut variations trending in 2026, broken down by what makes each one structurally different — not just what they look like in photos.
1. The Curtain Bang Wolf Cut

The curtain bang wolf cut pairs the signature crown layers with a center-parted fringe that sweeps outward, framing the face without closing it in. The bangs fall to cheekbone or nose level and blend seamlessly into the face-framing front pieces — so there’s no hard line where “bang” ends and “layer” begins. This continuity is what separates it from a standard curtain bang added to a regular cut. On finer hair, the open center part prevents the fringe from feeling heavy at the roots.
How To Style:
- Apply a light mousse or texturizing spray to damp hair before blow-drying.
- Using a round brush, roll the front sections outward and away from the face, directing airflow down the hair shaft to reduce frizz.
- Once dry, separate the curtain sections with your fingers — avoid a comb here, which creates too sharp a part and loses the effortless curve.
- Finish with a flexible-hold wax or pomade just on the ends of the bangs to define without stiffening.
Best For: Oval, heart, and long face shapes. Works best on fine to medium density hair; thick hair needs thinning shears on the fringe or it’ll puff outward instead of swooping.
Tools & Products: Boar bristle round brush (medium barrel), lightweight mousse, flexible-hold pomade for ends.
2. The Curly Wolf Cut

This is where texture mechanics matter most. A curly wolf cut — suited for 2B through 3B curl patterns — uses dry-cut layers placed at the crown to remove bulk without disrupting the curl clump lower down. Most stylists who cut this wet are guessing at how the curl will behave once dry. Ask specifically for dry cutting, or at minimum a dry-check after the wet cut. The result is a diffused, voluminous shape with defined curls at the ends and soft, cloud-like volume at the crown — not the triangle or mushroom shape you get when layers are cut incorrectly on curly hair.
How To Style:
- Apply your curl cream or leave-in conditioner on soaking-wet hair, smoothing it section by section from root to tip.
- Scrunch sections upward and let them air-dry 70% before diffusing — this sets the clump before heat touches it.
- Diffuse on low heat, cupping sections of hair into the diffuser bowl rather than moving it around.
- Once completely cool, break the cast gently by scrunching upward with a small amount of lightweight oil.
- Separate the crown layers lightly with fingertips only — not a pick, which disrupts the curl pattern and creates frizz at the root.
Best For: Round, square, and heart faces. 2B–3B curl types; works on medium to high density. Very fine curly hair may lose the crown volume quickly — use a volumizing curl cream, not a heavy butter.
Tools & Products: Diffuser attachment, curl cream (not butter-based), lightweight oil for finishing, microfiber towel for initial drying.
3. The Shaggy Lob Wolf Cut

The shaggy lob wolf sits at collarbone to shoulder length and is the easiest version to grow out gracefully — which is a real consideration most people skip when choosing a wolf variation. The perimeter length keeps enough weight to prevent the ends from going wispy as the cut grows, while the interior crown layers maintain the signature volume. On wavy hair specifically, this length hits a sweet spot: the wave pattern has enough hair to form a proper S-shape at the ends rather than just a slight bend. If you’re wavy and unsure which wolf length to commit to, this is the most reliable starting point.
How To Style:
- Spray sea salt spray onto damp hair and scrunch upward to encourage wave formation.
- Flip your hair over and rough-dry on medium heat, moving constantly to build volume at the root.
- Flip back upright and let the ends air-dry, or use a diffuser to set the wave pattern without stretching it.
- Finger-style the crown layers while they’re still slightly warm for the most effortless separation.
Best For: Oval, square, and round faces. Wavy to lightly curly hair, medium to high density. Pairs well with layered bob haircuts if you want to compare before committing to length.
Tools & Products: Sea salt spray, medium-heat blow dryer, diffuser, light-hold curl cream.
4. The Textured Pixie Wolf Cut

Calling this one a “pixie wolf” isn’t just a trend mashup name — it describes a structurally distinct cut where the crown layers are cut very short (often 2–3 inches), the sides are blended rather than undercut, and the nape is left with slightly longer, wispy pieces. The contrast between extreme crown height and the softer neckline is what gives this cut its signature look. On fine, straight hair, this version creates the most volume of any wolf variation, because the short crown layers have nothing weighing them down. The trade-off: it requires more frequent trims (every 6–7 weeks instead of 8–10) to keep the crown-to-nape ratio intentional.
How To Style:
- Work a dime-sized amount of volumizing mousse into damp roots, focusing on the crown.
- Blow-dry using your fingers pointed upward at the roots, directing volume straight up before styling it forward or sideways.
- Once dry, add a tiny amount of matte clay to the crown pieces and push them into your desired direction with your palms.
Best For: Oval and oblong faces. Fine to medium straight or slightly wavy hair. Not recommended for thick or coarse hair without significant thinning — the crown can become too bulky to hold shape.
Tools & Products: Volumizing mousse, blow dryer with concentrator nozzle, matte clay.
5. The Butterfly Wolf Hybrid

The butterfly cut and the wolf cut are often compared in 2026 because they look similar in photos, but they work through different mechanisms. The butterfly cut uses a high internal layer that creates a “wing” of volume mid-shaft. The wolf cut uses crown layers that cascade downward. The hybrid takes both: crown layers for root lift and a secondary layer placed mid-shaft for the wing effect. The result is more dramatic movement than either cut alone, and it works particularly well on thick, wavy hair that tends to sit flat on top. If you’re looking for volume at every level rather than just at the crown, this hybrid is the version to ask for.
How To Style:
- Apply a volumizing spray from root to mid-shaft on damp hair.
- Blow-dry in sections, lifting each section straight up and rolling the brush under, then over, to create the double wave effect at the layers.
- Cool each section briefly before releasing for longer-lasting shape.
- Finish with a light flexible-hold spray, not a hard-hold lacquer — you want movement, not freeze.
Best For: Oval, heart, and long faces. Thick, wavy or straight hair, medium to high density. Compare this with the butterfly haircut on medium hair before your appointment to decide which layer placement suits you.
Tools & Products: Volumizing spray, medium-barrel round brush, flexible-hold finishing spray.
6. The Blunt Fringe Wolf Cut

A blunt, straight-across fringe paired with a wolf cut creates an intentional contrast: the hard perimeter of the bang against the shaggy, lived-in texture of the layers. The fringe acts as a weight anchor, which paradoxically makes the rest of the cut look more disheveled in a controlled way. This version works across textures but requires the most maintenance — blunt bangs need a trim every 3–4 weeks or they start sitting on the eyes and lose their precision.
Quick Styling Note: Don’t blow-dry blunt bangs with a round brush — that adds curve you don’t want. Use a flat brush or paddle brush aimed straight down, with the nozzle pointed at the tips, not the roots.
7. The Color-Melt Wolf Cut

Color placement and cut structure work together in this variation. A color melt — where a darker root transitions into a lighter mid-shaft and end — is placed specifically along the layer lines of the wolf cut, so when the layers move, you see distinct shifts in color. The result looks dimensional without being high-contrast. If your colorist doesn’t account for where your layers fall when applying color, you lose a lot of the intended effect. Mention the layer placement at your color appointment, not just your cut appointment.
Quick Styling Note: This combination works best if you do the haircut first, then the color — that way the colorist can actually see where your layers break and place the melt accordingly. Doing it in reverse is surprisingly common and wastes the effect. For more color inspiration, check out summer hair color ideas that complement layered cuts.
8. The Long Wolf Cut

At bra-strap to mid-back length, the long wolf cut solves a problem that plagues thick-haired people with long hair: the triangle silhouette, where hair gets progressively wider toward the ends. Crown and mid-shaft layers redistribute that bulk upward, creating width at the top of the head and letting the ends skim rather than splay. This is the lowest-maintenance wolf variation in terms of styling time — long layers on wavy or thick hair air-dry with natural movement — but it needs the most careful cutting. Ask your stylist to point-cut into the ends rather than blunt-cutting them, or the perimeter gets boxy as it grows.
How To Style:
- Scrunch a medium-hold curl cream through wet hair from ends toward roots.
- Flip hair over and let it air-dry 80–90% — this is the lowest-effort approach for long wolf cuts.
- Once nearly dry, flip back and lightly scrunch the crown to re-activate any volume that settled.
- A small amount of oil on the ends prevents dryness without weighing down the layers.
Best For: Oval and oblong faces. Thick, wavy or straight hair. Not ideal for fine hair at this length — the layers can remove too much weight and leave the hair looking sparse at the ends.
Tools & Products: Medium-hold curl cream, lightweight finishing oil, microfiber towel.
9. The Wispy Bang Wolf Cut

Different from the blunt fringe variation, wispy bangs on a wolf cut are dispersed and feathered — they merge into the face-framing layers rather than sitting as a separate section. The effect is softer and more forgiving to grow out, which makes this a popular choice for people who like the idea of bangs but have commitment concerns. On fine, straight hair, wispy bangs add visual density at the forehead without adding actual weight. Ask your stylist to point-cut into the bang section rather than cutting straight across.
Quick Styling Note: The biggest mistake with wispy bangs is overworking them with product. A single pass of a fine-tooth comb while blow-drying is enough — adding product makes them clump and look greasy by midday.
10. The Bob-Length Wolf Cut

At chin to jaw length, the bob wolf cut is the shortest version that still reads as a proper wolf cut rather than just a textured bob. The distinction matters: a textured bob is cut with weight at the perimeter and texture added through the interior. A bob wolf cut reverses that — the crown layers are the primary structure, and the perimeter is deliberately jagged or point-cut to blend with the layers rather than provide a clean base. On fine hair, this length-to-layer ratio creates the most dramatic volume of any wolf variation, because there’s very little weight left to hold the hair down.
How To Style:
- Apply mousse to damp roots and a lightweight cream to the ends, keeping products in their respective zones.
- Rough-dry the roots pointing the dryer upward; smooth the ends gently downward.
- Finger-separate the crown pieces after drying for the intentionally undone look that makes this cut work.
- Use a flat iron only if you want to add a slight outward curve to the perimeter pieces — not to straighten the whole style, which removes the texture.
Best For: Oval, round, and heart faces. Fine to medium density hair, straight to slightly wavy. If you’re comparing this to a lob, see long bob hairstyles for how length changes the visual weight.
Tools & Products: Volumizing mousse, lightweight cream for ends, flat iron (optional), blow dryer with concentrator nozzle.
11. The 70s Feathered Wolf Cut

The 70s feathered wolf takes the cut’s natural structure and leans into a vintage blow-out technique: the layers are styled backward and outward from the face using a round brush, then allowed to fall forward for that winged, Farrah-adjacent look. The wolf cut’s crown layers are actually perfect for this because they’re already cut to flip outward naturally. This isn’t a new technique applied to a new cut — it’s a vintage technique that works uniquely well with this specific cut structure.
Quick Styling Note: The feathered effect collapses quickly on fine hair unless you use a light-hold finishing spray immediately after the blow-dry, while the hair is still warm. Let it cool completely before touching it.
12. The Wolfie Shag Hybrid

The wolf cut and the short shag haircut are close enough in structure that there’s genuine overlap in the middle — both use crown layers and textured ends, but the shag traditionally has more consistent layering throughout the entire length while the wolf concentrates weight removal at the crown. The hybrid splits the difference: crown-heavy layering plus shag-style perimeter texture. This reads as slightly more “retro” than a pure wolf cut and suits coarser hair that needs texture at every level, not just the top.
Quick Styling Note: Ask your stylist which version they’re gravitating toward when you show them inspiration photos — some stylists call every heavily layered cut a “wolf cut” regardless, and knowing the distinction helps you communicate what you actually want.
13. The Bixie Wolf Cut

Sitting between a pixie and a bob — roughly 3 to 5 inches in length — the bixie wolf uses the wolf cut’s crown-heavy layer structure but keeps the overall shape closer to a pixie than a lob. The result has more movement than a true pixie but more edge than a bob. On straight, fine hair, the combination of short crown layers and slightly longer sides creates the illusion of fullness across the entire head. The bixie cut is worth exploring in detail if this length range appeals to you.
Quick Styling Note: At this length, the difference between “intentionally undone” and “needs a trim” is very thin. Budget for trims every 5–6 weeks, not 8–10.
14. The Curtain-Free Wolf Cut

Not every wolf cut needs a fringe. The curtain-free version keeps a clean hairline — no bangs, no curtain layers framing the face — and relies entirely on the crown layers and perimeter texture for its structure. This version suits stronger features that don’t need softening at the forehead, and it’s lower maintenance since you’re not managing a fringe section. The face-framing front layers are still present, just not cut into bang length — they’re long enough to be pulled back.
Quick Styling Note: Without a fringe to anchor the front of the cut, the crown layers become the visual focal point. Make sure your stylist cuts them intentionally — this version looks flat if the crown layers are too long or too uniform.
15. The Dimensional Wolf Cut

The dimensional wolf cut uses highlight or lowlight placement to make the layer structure visible as the hair moves. Standard wolf cuts can look somewhat flat in photos because the layer depth isn’t always apparent in one tone. Adding lighter pieces at the crown and mid-shaft — and slightly deeper pieces at the nape — mirrors how natural sunlight would hit a layered cut. It’s not about adding a lot of contrast; it’s about color that follows the cut’s existing architecture. The result reads as fuller and more intentional even before styling.
How To Style:
- Apply a heat protectant evenly through damp hair before any thermal styling.
- Rough-dry until 80% dry, then use a round brush or diffuser depending on your texture to finish.
- Once dry, separate the crown layers with fingers rather than a comb to keep the dimensional color visible in distinct pieces rather than one solid mass.
- A shine serum on the mid-shaft and ends catches light along the layer lines and amplifies the dimensional effect.
Best For: All face shapes. Works on any texture, though it’s especially impactful on straight hair where movement alone can’t create dimension. Fine hair benefits most — the color creates visual depth that compensates for lack of physical volume.
Tools & Products: Heat protectant, round brush or diffuser, shine serum, blow dryer.
Why the Wolf Cut Actually Works — The Structural Case
Here’s what most roundup articles skip: the wolf cut isn’t just a vibe. It solves two problems simultaneously that most other cuts solve independently.
Problem one: volume without bulk. Traditional layering adds volume by removing weight through the mid-shaft and ends, which can leave the perimeter looking thin. The wolf cut concentrates its heavy layering at the crown, where you want lift, and keeps more weight toward the perimeter, which prevents the ends from looking wispy. You get root volume and perimeter weight in the same cut.
Problem two: texture without chaos. The shaggy, razored ends of a wolf cut aren’t just aesthetic. They break up the way light reflects off the hair, making the cut look “effortful” and dimensional even when you haven’t styled it at all. That’s why so many people report that their wolf cut looks better on day two or three than freshly styled — the texture needs a little settling to look intentional.
The 2026 variations are all playing variations on this formula: some lean into the volume problem (the long wolf cut, the bob-length wolf), some lean into the texture problem (the dimensional wolf, the color-melt wolf), and some do both at once (the butterfly hybrid, the curly wolf). Understanding which problem your hair has helps you pick the right version — and ask for it properly.
FAQ
How is a wolf cut different from a shag cut?
Both use heavy interior layering and textured ends, but the placement differs. A shag distributes layers more evenly throughout the length, giving consistent volume from top to bottom. A wolf cut concentrates most of the layering at the crown and lets the lower half keep more weight. The wolf generally reads as slightly more polished at the perimeter; the shag can look more uniform in texture.
Can you get a wolf cut on thin or fine hair?
Yes — it’s actually one of the better cuts for fine hair because the crown layers create lift without relying on density to hold volume. The key is asking your stylist to avoid razor cutting on very fine hair; point-cutting is less aggressive and won’t remove too much from an already-light texture.
How often does a wolf cut need to be trimmed?
Longer versions every 8–10 weeks; shorter versions (bob-length, bixie wolf, pixie wolf) every 5–7 weeks. The crown layers grow out fastest and are the first thing to lose the distinctive shape.
Does a wolf cut work on naturally straight hair?
It does, but it takes more effort to style than on wavy or curly hair. Straight-haired wolf cut owners generally need a sea salt spray or texturizing spray to approximate the texture that wavy hair creates naturally. Without it, the cut can look like a regular layered style rather than a wolf cut.
What do I actually say to my stylist when asking for a wolf cut?
Be specific about length, fringe preference, and your texture. Say something like: “I want a wolf cut at [length] with crown layers concentrated toward the top, point-cut ends, and [curtain bangs / no fringe]. I have [texture] hair — I know the layering approach is different. Can we talk through how you’d approach it for my texture?” That level of specificity prevents you from getting a generic layered cut that’s been renamed.
Is the wolf cut high-maintenance day to day?
Honestly, less than it looks. Once the cut is right for your texture, it air-dries with natural shape. The maintenance is really in the trimming schedule, not the daily routine — especially for wavy and curly versions that benefit from minimal manipulation.
Final Thoughts
The wolf cut has stuck around because it solves real structural hair problems rather than just following an aesthetic moment. Whichever version appeals to you most, the conversation to have with your stylist isn’t “I want a wolf cut” — it’s “here’s my texture, here’s the version I want, and here’s how I understand it should be cut for my hair.” That specificity is what separates a wolf cut that actually works from one that just grows out awkwardly within six weeks.

