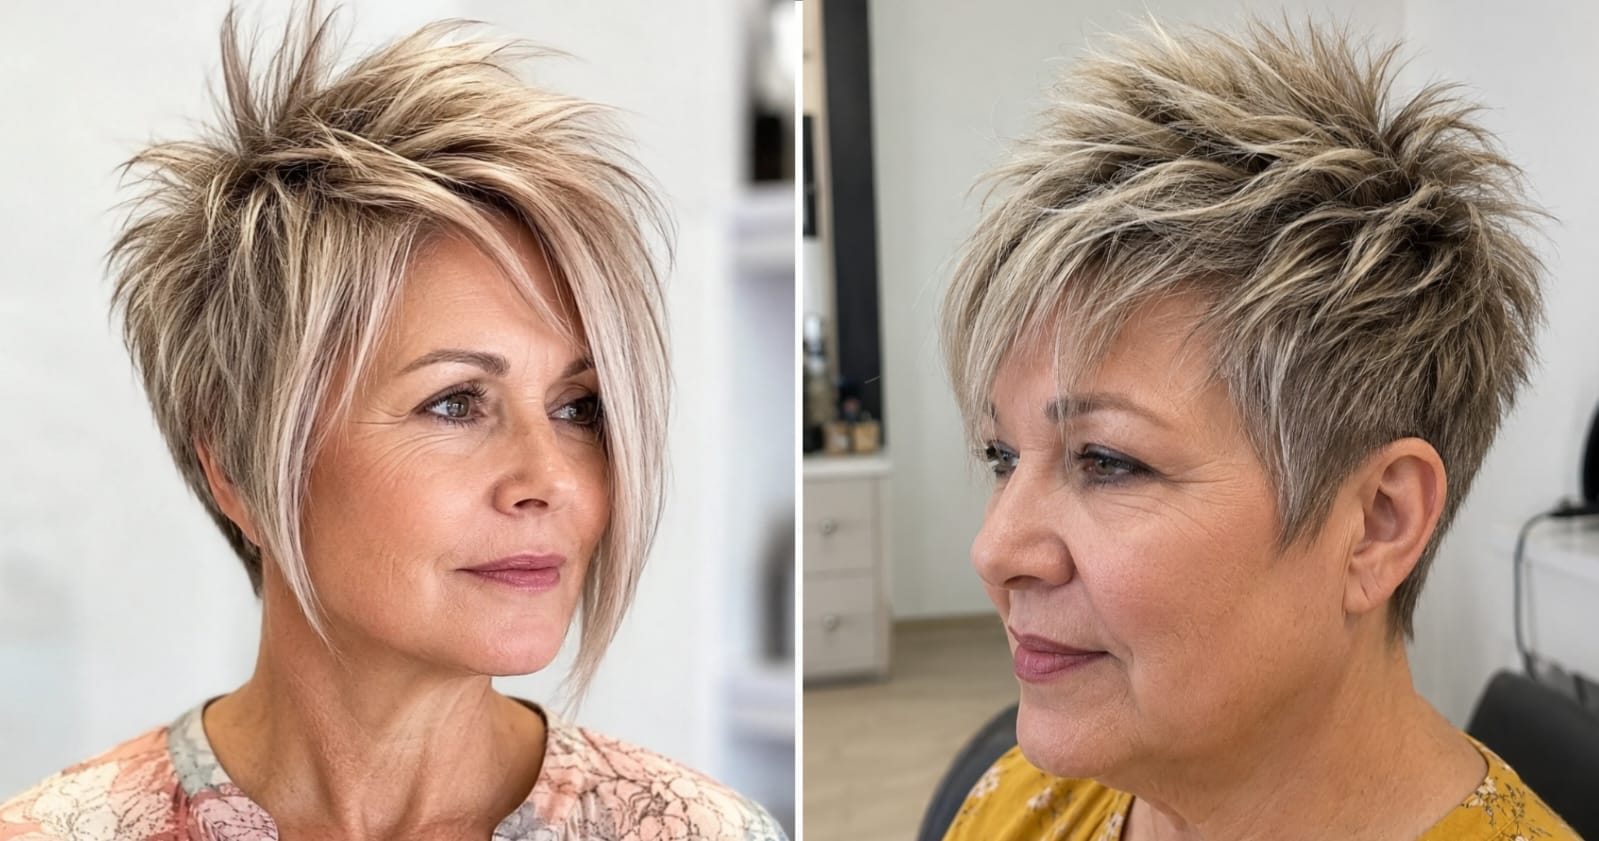
Spiky hair has a reputation problem — most people assume it belongs to teenagers or requires a very specific bone structure to pull off. What that assumption misses is that fine, lower-density hair that’s lost some of its youthful weight actually holds spiky texture better than thick, heavy hair. Thinner strands grip light product easily, sit flatter at the base for contrast, and don’t collapse under their own weight. The spikiness isn’t working against your hair. It’s working with what your hair has become.
Below are 18 spiky cuts ranging from soft textured tips on a pixie cut to full architectural crops with real edge. Each one includes the structural reason it works — not just what it looks like — because understanding why a cut does what it does is what separates a confident salon visit from a hopeful one.
Quick Guide
| Style | Best For | Key Product |
|---|---|---|
| Textured Micro Pixie | Fine hair, oval/heart face | Light pomade |
| Choppy Bob with Spiked Tips | Medium density, square face | Texturizing spray |
| Undercut Pixie | Thick or coarse hair, oval face | Strong-hold wax |
| Feathered Spiky Layers | Thin hair, round face | Volumizing mousse |
| Classic Punk Crop | All types, confident wearer | Firm gel |
| Disheveled Bedhead Pixie | Low-maintenance, fine hair | Dry shampoo + finger styling |
| Spiky French Crop | Receding hairline concern | Matte clay |
| Asymmetric Spiked Lob | Wavy or straight, oval face | Salt spray |
| Tapered Nape with Spiky Top | Fine hair, all face shapes | Pomade |
| Soft Spiky Layers on a Shag | Wavy hair, round or long face | Curl cream |
| Disconnected Undercut | Thick hair, angular features | Defining wax |
| Spiked Silver Pixie | Gray/silver hair, any density | Shine serum + wax |
| Cropped Mohawk-Inspired | High cheekbones, oval face | Strong-hold gel |
| Textured Side-Swept Crop | Heart or diamond face | Flexible hold spray |
| Short Shag with Spiky Bangs | Wavy or straight, all densities | Mousse + diffuser |
| Buzzed Sides with Textured Top | Bold preference, oval face | Matte paste |
| Spiky Bowl Cut (Modern) | Round face, thick hair | Pomade |
| Feathered Nape Taper | Sensitive about neck area | Light wax |
1. Textured Micro Pixie

A micro pixie sits close to the head all over, but the magic is in the tips: the stylist cuts them at uneven angles and you pull them into small, intentional points with your fingers. On fine or thinning hair — which tends to be the reality for many women over 60 — this cut is structurally ideal. Fine hair doesn’t have the weight to resist product, so even a tiny amount of pomade grips the ends and holds the spikes in place for hours without looking stiff. The result is graphic and modern, not spiky for its own sake.
How To Style
- Towel-dry hair and leave it about 80% damp — not soaking, not fully dry.
- Warm a pea-sized amount of light pomade between your fingertips.
- Work it through the tips section by section, pulling upward.
- Use your fingertips (not a brush or comb) to push specific pieces into points.
- Let it air-dry the rest of the way, or use a diffuser on low heat aimed upward.
Tip: Less product than you think. The most common mistake is loading up on pomade and ending up with greasy spikes that look unintentional. Start with less and layer up only if needed.
Best For: Oval, heart, or oblong face shapes. Fine or low-density hair.
Tools & Products: Bumble and bumble Sumo Tech (light hold), wide-tooth comb for root separation, diffuser attachment.
2. Choppy Bob with Spiked Tips

This is the entry point for anyone who wants spiky texture without committing to something very short. The length sits around the jaw or just below, but the ends are cut in choppy, disconnected layers that separate naturally and catch the light. When you apply a small amount of texturizing spray and scrunch upward, the tips lift into soft points — feminine rather than aggressive, but with real visual interest. It’s also one of the most versatile short bob variations for older women because the length still frames the face fully.
How To Style
- Apply texturizing spray to damp hair from mid-length to ends.
- Scrunch upward with both hands while blow-drying on medium heat.
- Once dry, take small sections at the tips and twist them gently between your fingers.
- Finish with a tiny amount of wax on just the very ends to define the points.
Tip: The choppiness lives or dies in the cut, not the styling. Ask your stylist specifically for “point-cut ends” — this means they cut into the tips at an angle rather than straight across, which creates the natural separation you need.
Best For: Square or oval face shapes. Medium-density, straight to wavy hair.
3. Undercut Pixie with Spiked Crown

The undercut pixie keeps the sides and nape closely cut — sometimes buzzed, sometimes faded — while leaving significantly more length on top. That length is then cut in layers and styled into upward spikes or textured peaks. On thick or coarse hair, this is structurally the most important spiky cut to know about: the undercut removes the bulk that would otherwise weigh down the top section, making it physically possible for the spikes to stand and hold their shape. Without the undercut, the same thick hair would require so much product to spike that it’d look wet and heavy.
How To Style
- Apply a small amount of strong-hold wax to towel-dried hair.
- Use a fine-tooth comb to push the sides flat against the head.
- Switch to your fingers for the top, pulling sections upward and forward.
- Shape specific spikes by twisting individual pieces between your thumb and forefinger.
- Mist with a light-hold hairspray to lock everything in place.
Tip: The undercut grows out fast — expect a trim every 4 to 5 weeks if you want the contrast to stay sharp. If that’s too frequent, ask your stylist to keep the undercut a bit longer so the grow-out is more gradual.
Best For: Oval or long face shapes. Thick or coarse hair. Works beautifully on naturally gray or silver hair.
4. Feathered Spiky Layers

Feathered layers are the gentle version of this entire category — no sharp geometric edges, no buzzed sides. Instead, the stylist cuts soft, tapered layers all over that feather outward and, with a little product, lift into light spikes around the crown and at the temples. This is the spiky cut for women who’ve been told their whole life that “edgy” isn’t for them. The feathering keeps everything soft enough that the spikes read as texture, not attitude. It also adds genuine volume to hair that’s become flat with age, which is why it appears on so many hairstyle lists for women with thin hair.
How To Style
- Apply volumizing mousse to damp hair from roots to mid-length.
- Blow-dry with a round brush, lifting at the roots throughout.
- Once dry, flip your head upside down and lightly tousle with your fingers.
- Stand upright and use your fingertips to separate and lift pieces at the crown.
- Finish with a flexible-hold spray, not a hard one — you want movement.
Best For: Round or square face shapes. Thin or fine hair of any density.
Tools & Products: Kenra Platinum Silkening Mist, volumizing mousse, medium round brush.
5. Classic Punk Crop

This is the one that started the conversation, and it’s worth understanding what makes it work structurally before you either commit to it or rule it out. A classic punk crop is cut very short all over with intentional texture through the top, then styled with firm gel or wax into defined, upright spikes. The reason it photographs so dramatically on older women — particularly those with strong silver or white hair — is contrast: silver hair reflects light at each spike tip, creating a graphic, almost sculptural quality that darker hair doesn’t produce in the same way. It’s not subtle, and it’s not trying to be. If you’re already enjoying a bold short haircut, this is the natural next step.
How To Style
- Start with completely dry hair.
- Work a generous amount of firm-hold gel through all sections.
- Use a wide-tooth comb to create a rough structure, then switch to fingers.
- Pull specific sections upward into points, working from crown outward.
- Let it set without touching — movement at this stage collapses the spikes.
Tip: Firm gel can look crunchy if you use too much. A trick is to scrunch the dried spikes gently once the gel has set — this breaks the cast and leaves the hold without the stiffness.
Best For: Oval face shapes with strong features. Any hair density, but works especially well on medium-thick hair.
6. Disheveled Bedhead Pixie

The bedhead pixie is deliberately undone — pieces going in slightly different directions, no clean lines, no visible styling effort. The irony is that it actually takes a specific cut to make it look this way. Your stylist needs to cut multiple lengths into the top section (what some call a “disconnected pixie”) so the pieces naturally separate and lift rather than lying flat. On fine hair, this cut is almost self-styling: a bit of dry shampoo at the roots for grip and some finger-raking through the top is genuinely all it takes. The spikiness here is casual, not architectural.
How To Style
- Spray dry shampoo at the roots and massage it in with your fingertips.
- Rake your fingers through your hair from front to back, then side to side.
- Identify 3-4 sections you want to stand up slightly and pinch them between your fingers.
- That’s it — stop there. Over-styling is what makes bedhead look fake.
Best For: All face shapes. Fine or thin hair. Low-maintenance lifestyles.
Tools & Products: Batiste Dry Shampoo, light-hold paste (Aveda Pure Abundance Style Prep), fingers only.
7. Spiky French Crop

The French crop has a flat, heavy fringe that sits across the forehead and a textured, spiky top behind it. The contrast between the smooth fringe and the lifted back section is what makes it interesting structurally — the fringe creates a clean horizontal line that anchors the face while the spikes above add height and movement. For women who are self-conscious about a receding hairline at the temples, the fringe is also a practical solution: it draws the eye forward and down, and the textured top redirects attention upward to the crown.
How To Style
- Blow-dry the fringe downward with a flat brush, pressing it smooth.
- Apply matte clay to the back section only and work it in with your fingertips.
- Push the back sections upward and slightly forward toward the fringe.
- Define individual spikes in the top section by twisting them between your fingers.
Tip: The fringe on a French crop needs trimming every 3 weeks or the clean line blurs. Build that into your budget before committing.
Best For: Oval, round, or heart face shapes. Medium density hair.
8. Asymmetric Spiked Lob

The asymmetric lob is longer on one side than the other — sometimes subtly, sometimes dramatically — with the ends cut in choppy, point-cut layers that spike outward rather than lying flat. The asymmetry adds a creative, modern quality that makes the spiky tips read as intentional design rather than messy styling. For wavy hair, this cut is particularly effective because the natural wave creates additional lift and separation at the ends, meaning the spikes form with minimal product. It’s also one of the few longer spiky options that works well if you’re growing out a pixie and want to transition with intention.
How To Style
- Apply salt spray to damp hair and scrunch from ends upward.
- Diffuse on low heat until about 90% dry.
- Once dry, separate the tips with your fingers, pulling them in different directions.
- Add a tiny amount of wax to just the ends to set the points.
Best For: Oval, long, or heart face shapes. Wavy or straight hair of medium to high density.
Tools & Products: Bumble and bumble Surf Spray, light wax, diffuser.
9. Tapered Nape with Spiky Top

The nape taper is one of the most flattering structural cuts for women over 50 because it removes weight from the back of the neck — an area where hair tends to puff outward as it thins and loses elasticity — while keeping length and interest through the top. Style the top into loose, upward-facing spikes and the contrast between the clean taper and the textured top is what creates the sophistication. This is a good choice if you want something that reads as polished in professional settings but has enough edge that it doesn’t look like a standard short cut.
How To Style
- Blow-dry the sides and back close to the head with a flat brush.
- Apply a small amount of pomade to the top section.
- Use a wide-tooth comb for initial lift, then switch to fingers for final shaping.
- Pull pieces at the crown upward and slightly to one side for asymmetric interest.
Best For: All face shapes. Fine to medium-density hair.
Tools & Products: Light pomade, flat brush, wide-tooth comb.
10. Soft Spiky Layers on a Shag

A shag cut already has volume, layers, and movement built in — adding spiky texture to the tips is a relatively small change that pays off visually. The layered structure of the shag means the tips naturally point outward and upward rather than downward, so they’re already halfway to spiky before you even touch product. On wavy hair, this is especially true: the wave creates natural separation and a bit of curl cream is enough to define the ends into soft, irregular spikes. The result is bohemian and relaxed rather than sharp or architectural.
How To Style
- Apply curl cream to damp hair, raking it through from roots to ends.
- Diffuse on low heat, scrunching upward as you go.
- Once dry, flip your head forward and shake at the roots.
- Use your fingers to separate layers and lift the tips outward.
- Finish with a light-hold spray.
Best For: Round or long face shapes. Wavy or naturally textured hair.
Tools & Products: DevaCurl SuperCream, light-hold spray, diffuser.
11. Disconnected Undercut

The disconnected undercut is more dramatic than the standard undercut pixie: the length difference between the sides and the top is intentionally exaggerated, with no blending or fading between the two sections. The side sections might be buzzed very close while the top has several inches of length styled into defined spikes. The visual impact is significant, and the structural reason it works on older women with thick hair is the same as the standard undercut — removing the bulk from the sides makes the top spikes achievable — but the disconnection amplifies the contrast and makes the final look feel artistic.
How To Style
- Apply strong wax to the top section only.
- Comb the sides smooth and flat with a fine-tooth comb.
- Use your fingers to pull the top into defined, upright spikes.
- Finish the sides with a light mist of hairspray to keep them flat.
Best For: Oval face shapes. Thick or coarse hair. Best for confident wearers comfortable with high-contrast looks.
Tools & Products: American Crew Fiber, fine-tooth comb, light-hold hairspray.
12. Spiked Silver Pixie

Silver hair is worth discussing separately because it behaves differently than pigmented hair. Silver and white strands tend to be coarser in texture — a natural protein shift that happens as melanin production slows — and that coarseness means they hold spiky shapes with less product than the same pixie would need on fine, pigmented hair. They also reflect light at the tips in a way that emphasizes the spike’s shape, making the cut look sharper and more deliberate than it might on darker hair. If you’re embracing gray, a spiky pixie isn’t just aesthetically bold — it’s structurally well-matched to what silver hair actually does.
How To Style
- Apply a very small amount of pomade or shine serum to dry or slightly damp hair.
- Work in sections, pulling tips upward and outward.
- Use the coarseness of the hair to your advantage — it will hold the shape.
- Finish with a light-hold spray only if needed.
Tip: Silver hair can occasionally look dry when styled with wax-heavy products. A drop of serum mixed into your pomade before applying adds shine and keeps the spikes from looking dull.
Best For: All face shapes. Medium to coarse silver or white hair.
Tools & Products: Oribe Crème for Style, shine serum (Moroccanoil Treatment Light), light-hold spray.
13. Cropped Mohawk-Inspired

A Mohawk-inspired crop doesn’t require shaved sides — a softer version keeps the sides short but not buzzed, with the top section cut longer and styled into a center strip of upright spikes. The key structural element is the length contrast: the sides must be noticeably shorter than the top for the central spikes to read as intentional rather than just poorly combed. On women with high cheekbones and strong facial structure, this cut is particularly striking because the central strip of height draws the eye upward and emphasizes the width of the face.
How To Style
- Flatten the sides with a flat brush and a small amount of gel.
- Apply strong-hold gel only to the top center strip.
- Use a fine-tooth comb to gather the top section slightly toward center.
- Pull into upright spikes from front to back.
Best For: Oval or high-cheekbone face shapes. Medium density hair.
Tools & Products: Strong-hold gel, fine-tooth comb, light-hold finishing spray.
14. Textured Side-Swept Crop

The side-swept crop channels most of its length to one side while the other side is cut shorter and close to the head. Adding spiky texture to the longer side — particularly at the tips — gives this otherwise classic cut an edge. The asymmetry does structural work: it avoids the center-heavy symmetry that can broaden the appearance of round faces, and it gives the spiky tips a direction and purpose rather than just floating upward randomly.
How To Style
- Blow-dry with a round brush, directing the longer section across the forehead.
- Apply flexible-hold spray to the longer side.
- Use your fingers to separate and spike the tips once dry.
- Keep the shorter side smooth with a flat brush and a small amount of pomade.
Best For: Heart or diamond face shapes. Straight to wavy hair of any density.
Tools & Products: Flexible-hold spray, round brush, light pomade for the shorter side.
15. Short Shag with Spiky Bangs

This combines two distinct texture zones: a full, layered shag on the body of the hair and a blunt-ish fringe that’s styled to spike or separate slightly at the tips rather than lying flat. The bangs being slightly spiky rather than perfectly smooth keeps the whole cut from feeling too neat or too predictable. On wavy hair, the bangs may do this naturally — on straight hair, a touch of mousse and a diffuser or a flat iron used to bend the tips outward creates the separation. The shag below adds volume and movement that balances the short, textured fringe.
How To Style
- Apply mousse from roots to ends on damp hair.
- Diffuse the main body of the hair, scrunching upward.
- Style the bangs separately: bend the tips forward and slightly outward using a small-barrel diffuser or your fingers.
- Once dry, use a tiny bit of wax on the bang tips to hold the separation.
Best For: All face shapes. Wavy or straight hair of any density.
Tools & Products: Mousse, diffuser, small-barrel attachment, light wax.
16. Buzzed Sides with Textured Top

Close to the disconnected undercut but with the sides buzzed rather than just cut short. The buzzing is done with clippers — typically a 1 or 2 guard — which leaves a very small amount of hair close to the head. The top is left significantly longer and styled into textured, upward spikes. The visual contrast is the most dramatic of all the cuts on this list, and the structural maintenance is actually quite easy: buzz the sides yourself at home between salon visits, and the top requires only occasional trims to maintain length.
How To Style
- Apply matte paste to the top section.
- Pull the top into rough spikes with your fingers.
- Use a fine-tooth comb to flatten any pieces at the sides that are growing in.
- Finish the top with a light spray.
Tip: If this is your first time going this short on the sides, start with a 3 guard rather than a 1 or 2. You can always go shorter at the next trim, and it gives you time to get used to the contrast before committing to the full version.
Best For: Oval or oblong face shapes. Bold preference required. Works on any hair density.
17. Modern Spiky Bowl Cut

The bowl cut is back — and in its modern version, it’s been reworked into something genuinely interesting. The classic bowl shape (blunt all-around perimeter at roughly the same length) is kept, but the interior is cut in heavily texturized, disconnected layers that spike upward from the bowl’s edge. It reads as structured from the outside and wild from the inside, which is a dynamic combination. On thick hair, it solves a classic bowl-cut problem: the weight of thick hair collapsing the interior. The interior layers remove enough bulk to allow the spikes to actually stand.
How To Style
- Blow-dry the outer perimeter smooth and flat using a flat brush.
- Apply pomade to the interior sections only.
- Use fingers to push interior sections upward toward the crown.
- Keep the perimeter clean — don’t let product touch the outer edge.
Best For: Round face shapes. Medium to thick hair.
Tools & Products: Medium-hold pomade, flat brush for the perimeter, wide-tooth comb for interior separation.
18. Feathered Nape Taper

The final cut is the most subtle entry on this list and the one most likely to feel accessible to someone who has never worn spiky hair before. The nape is tapered very gradually — no dramatic clipper work — and the tip of each layer at the back and sides is cut at an angle so it feathers outward slightly rather than lying flat. From the front, this looks like a standard short cut with soft texture. From the back and side, the feathered tips catch the light and create a quietly spiky finish. It’s the kind of cut that reads as “something is different about her hair” without immediately reading as “spiky.”
How To Style
- Blow-dry all sections with a round brush, lifting at the roots.
- Warm a very small amount of light wax between your palms.
- Run your fingers through the outer layers from root to tip.
- The feathering will appear as the layers separate and dry into place.
Best For: All face shapes. Fine to medium-density hair. Excellent starting point for first-time spiky-cut wearers.
Tools & Products: Light wax (Bumble and bumble Brilliantine), round brush, light-hold spray.
FAQ
Can older women really pull off spiky haircuts?
Yes, and structurally they’re often better suited to it than younger women. Fine or thinning hair holds product better, and gray hair’s natural coarseness adds grip. Just choose the right intensity level for your density and comfort zone.
What face shapes look best with spiky hair?
Oval faces suit virtually every cut on this list. Round faces benefit from height at the crown to elongate. Square faces look best with softer, feathered texture. Heart faces pair well with asymmetric or side-swept styles.
How much maintenance do spiky haircuts require?
Sharper cuts like undercuts need a trim every 3 to 5 weeks. Softer styles like the bedhead pixie or nape taper can go 6 to 8 weeks. Daily styling takes 2 to 5 minutes on most of these cuts.
What products work best for fine or thinning hair?
Light pomades, matte clays, and texturizing sprays are your best options. Avoid heavy gels — they add weight and collapse the shapes you’re trying to create. Dry shampoo adds grip on very fine hair before any other product.
Do spiky cuts work on naturally curly hair?
Yes. Curly hair creates its own spiky texture through curl definition — a short curly pixie with defined ringlets reads as beautifully spiky with curl cream alone. More dramatic upright spikes are harder to achieve without heat straightening first.
Will a spiky cut make me look older or younger?
Neither framing is useful. A well-cut spiky style simply makes you look like someone who made a deliberate choice. Modern short crops tend to read as confident and current — not age-associated in either direction.
Final Thoughts
Spiky hair isn’t a statement about trying to look young or being unconventional for its own sake. For older women, it’s often the most structurally logical choice — cuts that work with thinner, lighter, coarser hair rather than fighting it. Whether you start with barely-there feathered tips or go straight to a punk crop, the principle is the same: let your hair do what it’s become capable of doing, and build the style around that.

